The Content Provided on HackClarify are Only for Security Awareness & Educational Purposes Only, Hackclarify is Not Responsible for any Harm Done!
Place Your Ads Here By Requesting Using The Contact Form
Hack Qubee/Banglalion Use Net Free without making Payment.
This is For My Bengali Pals, trust me it wont work outside our country, i made it in bangla so its easy.
Qubee হ্যাক করে ফ্রী-তে অথবা বিল পরিশধ না করে ইন্টারনেট ব্যবহার করুন।
বিঃদ্রঃ "Hack"টি এখনও কাজ করে, শুধুমাত্র "qubee@qubee.com.bd" অ্যাকাউন্টটি কাজ করে না। "Hack"-টি বন্ধ করার মত বুদ্ধি এখনও Qubeer হয়নি। :P
খুব সহজে বলতে হলে, আপনার অ্যাকাউন্ট যদি "suspended" হয়ে থাকে তাহলে আপনি আর ব্যাবহার করতে পারবেন না।
তবে, আপনি যদি প্রিপেড গ্রাহক হন, এবং আপনার কার্ড-এর "usage limit" যদি শেষ হয়ে যায়, তাহলে আপনার অ্যাকাউন্ট-টি
ঠিকই "connect" হবে, কিন্তু আপনি কোন ইন্টারনেট পাবেন না। এর বদলে, "Qubee" ওদের একটি পেজ-এ নিয়ে যাবে। এমতাবস্থায়, আপনি নিচের দাওয়া সফটওয়্যার ব্যাবহার করে ইন্টারনেট ব্যাবহার করতে পারবেন।
অথবা, আপনি যদি পোস্টপেড গ্রাহক হন, কিন্তু আপনার বিল ঠিক সময়ে না পরিশোধ করায়, আপনার মডেম connect হবে, কিন্তু আপনি কোন ইন্টারনেট পাবেন না। এর বদলে, "Qubee" ওদের একটি পেজ-এ নিয়ে যাবে। এমতাবস্থায়, আপনি নিচের দাওয়া সফটওয়্যার ব্যাবহার করে ইন্টারনেট ব্যাবহার করতে পারবেন।
আপনি যদি Banglalion গ্রাহক হন এবং আপনি উপরোক্ত অবস্থায় থাকেন, তাহলে নিচের সফটওয়্যার-টি কাজ করবে।
শেষ কথাঃ
আপনি যদি না বুঝতে পারেন বা না করতে পারেন তাহলে আমি কোন সাহায্য করবো না। এবং, আমি আর কোন অতি শহজ করে tune লিখব না। অর্থাৎ, আমি আপনাদের কাউকে চামচ দিয়ে তুলে, খাওাইয়ে দিব না।
কারন, আমি চাই না যে যাদের মাথায় বিন্দু মাত্র বুদ্ধি বলে কিছু নেই, তারাও এই শুভিধা উপভগ করুক। এবং, না পেরে বলা শুরু করুক যে এইটা virus/trojan। যারা এটি বলেছে, তাদের আমি বলতে চাই যে, আপনার যদি তাই মনে হয় তাহলে, virustotal.com এ যেয়ে ৩৫টি antivirus দিয়ে চেক করতে পারেন এবং তাহলে দেখতে পাবেন এটিতে কোন virus নেই। "F*ck You"
আর যারা, আমার উপর আস্থা রেখেছেন এবং ব্যাবহার করে খুব খুশি আছেন, তাদের আগাম শুখবর দিতে চাই। আমি খুব শিগ্রই,
পুরো ঢাকাতে বিস্ত্রিত "iconnect" wifi ও BTCL-এর ADSL ইন্টারনেট free-তে ব্যাবহার করার নিয়মাবলি লিখে "tune" লিখব।
এটি উভয় prepaid ও postpaid গ্রাহক-রা ব্যবহার করতে পারবেন। এবং, আপনারা একটু সাহায্য করলে Banglalion-এও এই শুভিধা উপভোগ করতে পারবেন।
প্রথমত, আমি বাংলা খুব একটা লিখি না তাই ভুল ভ্রান্তি মাফ করবেন। দ্বিতীয়ত, আমি এটি করার জন্য অনেক কষ্ট করেছি, তাই দয়া করে ধন্যবাদ দিলে খুশি হবো এবং আপনি যদি আপনার ব্লগে আবার পোস্ট করেন, তাহলে দয়া করে আমার নাম লিখবেন।
আমি এই পদ্ধতিতে গত ৬ মাস ধরে ইন্টারনেট ব্যাবহার করছি কোন বিল না দিয়ে এবং কোন সমস্যা ছাড়া। (যদিও ইন্টারনেট ব্রাওজিং মাঝে মাঝে একটু সমস্যা দেয়, Youtube video ও যে কোন ডাউনলোড অস্বাভাবিক ভালো। এখন আপনিও করতে পারেন। এই পদ্ধতিতে আপনি নিম্নে ৫১২ কেবিপিএস এবং সরবচ্চ ১/২ এমবিপিএস পাওয়া সম্ভব। এটি আপনার RSSI এবং CINR Signal Strength এর উপর নির্ভর করে।
এখানে কি করা হচ্ছে, তা নিয়ে বিস্তারিত একদম নিচে লেখা আছে।
প্রথমে এই লিঙ্ক থেকে ফাইলটি ডাউনলোড করে রেখে দিন। আমাদের এটি পরে লাগবে।
http://www.mediafire.com/?84bbo4dnvtn3sjp
Password: qubee
১। প্রিপেড গ্রাহকদের জন্য নিয়মাবলী
দয়া করে, এই নিম্নে লেখা কিছু করার আগে, আপনার নিজ নিজ username ও password সংরক্ষিত করে রাখুন।
ক। আপনার যদি USB মডেম থাকে, তাহলে আপনার মডেম অপশন-এ গিয়ে
Username: qubee@qubee.com.bd ও
Password: prepaid
লিখে Connect বতাম ক্লিক করুন।
এইবার আপনি যদি কোন ইন্টারনেট ব্রাউজার খুলে, যে কোন ওয়েবসাইট-এ জান, আপনার সেই ওয়েবসাইট না এসে আপনাকে বিল দাওয়ার জন্য একটি পেজ আসবে।
(এরপর “গ” থেকে পরুন)
অথবা
খ। আপনার যদি বড় Gigaset মডেম থাকে, তাহলে, আপনার ইন্টারনেট ব্রাউজার খুলে, নিম্নের এই অ্যাড্রেসে যান,
http://192.168.3.1/
তারপর OK ক্লিক করুন।
“Advanced Settings” ক্লিক করুন
তারপর, “Wimax Configuration” ক্লিক করুন
তারপর,
Username: qubee@qubee.com.bd ও
Password: prepaid
লিখে OK বতাম ক্লিক করুন।
এবার, “Administration” ক্লিক করে “restart” ক্লিক করুন,
তারপর, প্রতিবার “OK” চাপ দিয়ে, আপনার মডেম, restart ও connect হবার জন্নে ২ মিনিট সময় দিন।
এইবার আপনি যদি কোন ইন্টারনেট ব্রাউজার খুলে, যে কোন ওয়েবসাইট-এ জান, আপনার সেই ওয়েবসাইট না এসে আপনাকে বিল দাওয়ার জন্য একটি পেজ আসবে।
(এরপর “গ” থেকে পরুন)
গ। এইবার পুরবে ডাউনলোড করা ফাইলটি extract করুন
“Qubee Hack” আইকনটি “Right-click” করে “Run As Administrator” ক্লিক করে “continue” বা “Yes” চাপুন।
এরপর আবার “yes” চাপুন।
এবার হাতের ডান দিকে নিচে দেখতে পাবেন একটি লাল রঙের আইকন, এটি “Double-click” করুন এবং “Unblock” বা "Allow access" চেপে “yes” চাপুন।
এরপর একটি window আসবে, যেটি পরলে বুঝবেন যে Connect হচ্ছে।
আপনার এখন কিছু করতে হবে না, যখন window-টি, একাই নিচে চলে যাবে, আপনি “connected” হয়ে গিয়েছেন।
এখন আপনার ব্রাউজার বা “torrent” খুলে internet browse বা download শুরু করুন।
২। Postpaid গ্রাহকদের জন্য নিয়মাবলী
যেহেতু Postpaid গ্রাহক রা একবার বিল দিলে সারা মাস চলে। আপনাদের নিয়মটা হাল্কা ভিন্ন।
সাম্নের মাসে আর বিল দিবেন না, তারপর দেখবেন ১০-১৫ দিন পর আপনার সংযোগ বিচ্ছিন্ন হয়ে গিয়েছে এবং আপনি কোন ওয়েবসাইট-এ গেলে আপনাকে বিল দাওয়ার একটি পেজ-এ নিয়ে জাচ্ছে।
এই অবস্থা থেকে আপনি, “গ”-এর নিয়মাবলী অনুসরণ করুন এবং আর বিল দাওয়া পুরোপুরি বন্ধ করুন।
অথবা,
আপনার অ্যাকাউন্ট যদি পুরোপুরি "suspended" হয়ে থাকে, বা "connect"-ই না হয়, তাহলে
"প্রিপেড" গ্রাহকদের নিয়মাবলী অনুসরণ করুন।
শেশ কথাঃ
কোন সমস্যা হলে, নিচে লিখুন এবং আমি সাহায্য করবো।
আমার “হ্যাক” টি সম্পরকে বিস্তারিত জানতে, আমার লেখা গুলা পরুন,
http://groups.google.com/group/wimax-hacking/browse_thread/thread/33b52984d0837320/6325e2a8bb71a6ef?lnk=gst&q=progress#6325e2a8bb71a6ef
http://groups.google.com/group/wimax-hacking/browse_thread/thread/89f171b0b574a861/c192ef674ea79bc9?lnk=gst&q=report#c192ef674ea79bc9
খুব ছোট করে বলতে হলে,
আপনাকে Qubee বিল দাওয়ার পেজ-টি, captive firewall, দিয়ে করে। এর জন্য udp protocol-এ port 53 খোলা রাখতে হয়, আর আমি খুব simply সব internet traffic udp 53 দিয়ে নিচ্ছি, আর তাই আপনি ইন্টারনেট পাচ্ছেন।
আর কিছু সফটওয়্যার দিয়ে একি জিনিস করা সম্ভব, কিন্তু বেশির ভাগেই আপনার নিজস্ব server থাকা লাগে।
নামগুলো হলও,
iodine,
dns2tcp,
udptunnel,
pd-proxy ও
vpncup.com
server-এ লোড কমানর জন্য এবং সবসময় ব্যাবহার-যোগ্য করতে, আমি PD-Proxy ও vpncup.com নিয়ে খুব শিঘ্রই আরও দুটি পোস্ট করবো।
আমি নিজে Qubee পোস্টপেড ব্যাবহার করি। আপনারা যদি এটি আরও ভালো করতে চান, বা Banglalion-এও একি জিনিশ করতে চান।
তাহলে, আপনার কারও Qubee prepaid modem অথবা Banglalion মডেম ১/২ দিনের জন্য আমাকে ধার দিলে, আমি Banglalion দিয়ে ফ্রী ইন্টারনেট ব্যাবহার করার একটি পোস্ট করতে পারব কারন আমার নিজের টাকা খরচ করে আর কোন মডেম কিনার ইচ্ছে নাই।
আপনারা কেউ, সাহায্য করতে ইচ্ছুক হলে, আমাকে ফেসবুক-এ মেসেজ পাঠাতে পারেন অথবা নিচে কমেন্ট-এ লিখতে পারেন।
রাহাত মাহবুব।
32-bit user-রা যারা "connected"
পাচ্ছেন কিন্তু, ব্রাউজার খুললে "server not found" পাচ্ছেন, তাদের জন্য একটি অস্থায়ী শমাধান দাওয়া হোল।
http://www.mediafire.com/?o2qx4xg0ztrhrkf
এটি ডাউনলোড করে extract করুন। তারপর "Reinstall Tap Driver" Right-click করে, "Run as Administrator"-এ ক্লিক করুন। এরপর, আবার লাল রঙের "Qubee hack" আইকনটি double-click করে, connect করুন।
64-bit user-রা এটি ডাউনলোড করুন।
http://db.tt/2BquDN0F
এটি ডাউনলোড করে extract করুন। তারপর "Install" Right-click করে, "Run as Administrator"-এ ক্লিক করুন। এরপর, আবার লাল রঙের "Qubee hack" আইকনটি double-click করে, connect করুন।
Read More Add your Comment 24 Replies
Macbook Thrashes Ultrabook Analysts Give Bad Numbers
The HP Envy 14 Spectre premium ultrabook starts around $1,399 directly from HP. PC markers don't fare well at all competing with Apple at the high end of the market, says an IDC analyst.
(Credit: Brooke Crothers)
Ultrabook numbers will fall far short of Intel's aggressive market share targets, an IDC analyst told CNET. The MacBook Air, meanwhile, continues to coast amid continued popularity.
An IDC report today showed a weak PC market caught in its seventh consecutive quarter of little to no growth.
"The volume isn't there and it's going to be way below what Intel had hoped for," IDC analyst Jay Chou told CNET, referring to ultrabooks.
"The first half [of 2012] is about 500,000 ultrabooks shipped worldwide. It's nowhere near Intel's initial hope," Chou said. Ultrabooks are thin, lightweight Windows laptops that compete with Apple's MacBook Air.
Apple MacBook Air.
(Credit: Apple)
(Credit: Apple)
Intel had said at the beginning of the year that ultrabooks could take 40 percent of the consumer laptop market.
"We might hit a million [ultrabooks] this year. The future really lies in 2013 and how well it jells with Windows 8," Chou added.
IDC expects about 225 million laptops to ship by the end of 2012. So, a million would be a tiny fraction of that market.
"The MacBook Air is a good part of Apple's business. It's had good growth," Chou said.
Unit shipments of Apple's MacBooks were up in the most recent reported quarter (Q2) to about 2.8 million (PDF) compared with 2.75 million in the same quarter last year.
Why the ultrabook shortfall? "A lot more models have to hit that $700 spot and they need a more lightweight and faster responding OS like Windows 8," according to Chou.
And it's hard to make inroads into a market that Apple practically invented. "They [Apple] really know how to magnify their strength. PCs typically out-spec them. But it's really just saying I have a bigger engine," which doesn't resonate with as many customers as before, he said.
Intel declined to comment.
Read More Add your Comment 0 Replies
Yasar's Crypter v1.0(With Stubgen) Best FUD Crypter Publicly Available
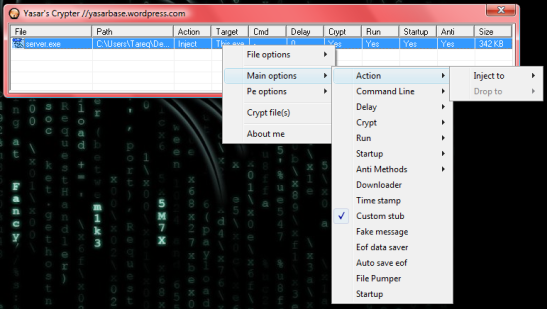
Hey there, well recently i just launched a Crypter that i have programmed, well i am not sure if i should say i fully coded it, but credit goes to a few crypter sources out there i have created my own cypter “Yasar’s Crypter” along with my Automatic Unique Stub Generator “Yasar’s StubGen”. It hs got all latest functionalities of all latest crypters. Its fully free and FUD. I have given a free FUD stub and you can create or modify your own stubs.
Please do share and feel free to post it on your Blogs, Youtube Channel, Websites, Facebook, Twitter etc..
You can read about the functions and the crypter over here: http://www.yasarbase.wordpress.com/crypter
Screenshot:
If there is any Bugs on it please inform me and if you find anything that makes you happy or sad, let me know via comments and pretty soon i will be posting a tutorial on using “Yasar’s Crypter v1.0″
Get Yasar’s Crypter NOW for Free!!
If you make a review of Yasar’s Crypter on your Blog or Youtube Channel, the first 10 Reviewers will be getting the Yasar’s Crypter v2.0 before anyone else gets it and will be given a special stub (along with the free gifted stub).
If you have reviewed/shared, please attach your link in the comment secion.
So Happy Crypting & Sharing!!
This blog post was posted on Yasar's Code Base my personal code/software blog, so its not a real top of a class post but hope you liked it!
Read More Add your Comment 6 Replies
How To UNDO Sent Mail on Gmail
Lot of times you might think to change the contents of the email, after you hit the send button. But there are no undo buttons in case of sent emails elsewhere rather then Gmail. By using this hidden Gmail feature, you get back your sent email from your gmail account. So in case you hit the send button a little too soon, you can click undo (CTRL+Z) button within 30 sec of hitting send button and you’re good to go.
> Open Gmail and click on small settings icon on top right corner.
> Select mail settings and go to Labs tab. Search for undo and check the undo send feature, Click save changes.
Next time you hit the send button you can see a undo option for 30 sec. Have Fun!!
Read More Add your Comment 2 Replies
Easily Share, Secure & Backup Your Files via Dropbox
Ever wanted to share photos from a recent party or your favorite music with friends? Or collaborate on a school project? Dropbox should be of a great use for you.
Dropbox is an online backup, sync and sharing tool that provides free accounts which makes it easy share of files with your friends.
With there are already hundreds of ways to share files, how does Dropbox make the difference?
Do you use Windows Live Messenger (MSN Messenger), Yahoo Messenger or Skype to share files with friends? On them, both you and your friend need to stay online while the transfer occurs.
Use a file uploading service like MediaFire to share files with friends? While it allows both you (the uploader) and your friend (downloader) to be online at your own convenient time, there is still the hassle of sharing the “share links” itself.
What Dropbox offers, just a one time pairing of folders, and the sharing becomes as simple as placing the files on your local computer. No more waiting for friends to come online, no more copy pasting of share links!
How Dropbox works is rather syncing of two folders between the paired folders on two (or more) computers. Once you put something on that share folder, it gets auto updated on your friend’s computer who is sharing it with you. And as there is theDropbox servers to hold that file as well, both of you do not need to stay online at the same time. When you come online, the files get synced to the Dropbox servers. Then when your friend comes online, it updates the files on his computer.
The best possible use of Dropbox can be collecting photos from a recent party. The “Send pics on mails”, “Upload pics you got on facebook”… those days are over!
With Dropbox, you create a share folder for the party and send share requests to your friends. Then everyone joins and puts the photos they got on that share folder on their own computer. The result? Now everyone on the share got all the photos of the party. No more going through facebook or mail to download every individual file. Cool ha?
Join Dropbox today and start sharing your files (specially paty pics ;) ) easily. Dropbox gives you 2GB of storage for free. But if you use this link (Dropbox.com), you will get an additional 250MB bonus space!
So, what you waiting for? Join Dropbox now following this link: http://www.dropbox.com/
Happy sharing :)
Read More Add your Comment 0 Replies
Lock your PC with a USB Flash Drive
Ever wanted to be like James Bond and be secretive? So you can prevent access to your computer, but with just a password, you are missing out on an alternate (and more secure) way to lock down your computer.
Predator, a free Windows program, turns your USB drive into a key that locks your computer when it's removed. To unlock your computer, you'll have to plug the USB drive back in. (Talk about having secret-agent-style security.)
Anyone who attempts to access your computer without the USB flash drive will be hit with an epic "Access Denied" message. To get started, follow this guide:
Step 2: Once Predator launches, plug in your USB flash drive. None of the contents of the drive will be deleted or altered in any way, so feel free to use your primary thumbdrive.
When you insert the drive, a dialog box will appear asking you to create a password. Click OK to continue.
Step 3: In the Preferences window, take note of a few key settings. First, enter a secure, unique password in the "New password" field. If you lose your USB drive, you'll use it to unlock your computer.
If you'd like, you can check the Always Required box and you'll be asked to enter the password each time you use your thumbdrive to unlock your PC.
Finally, in the section under Flash Drives, ensure that the correct USB flash drive is selected. When you're done, click "Create key" and then OK.
(Credit: Predator)
Step 4: Predator will exit. When it does, click the Predator icon in the taskbar to restart the program. A few seconds later, the icon will turn green, alerting you that Predator is running.
Every 30 seconds, Predator will check to see that your USB drive is plugged in. If it isn't, your computer will dim and lock down.
Here are some extra tips:
- To pause Predator at any time select "Pause monitoring" from the taskbar menu.
- If someone tried to access your PC while it was locked down, you'll see the activity log when you log back in. You can see the log at any time by clicking "View log" from the taskbar menu.
- Predator's Web site has several cool how-tos, including one that shows you how to program your computer to take a snapshot each time someone tries and fails to log in to your computer. Check it out.
One obvious flaw comes with this setup: you'll always be down one USB port. But if you're sold on Predator, consider purchasing a USB hub to compensate.
Read More Add your Comment 2 Replies
Some Maintainence & Slow Development
It is That HackClarify will not post any content, for some days. This was because of the random amount of posts by me, which led to less amount of comments,subscriptions and shares.
We might also have to never post again in HackClarify for this reason.
All readers are being dedicated.
Well, at the time of the Break, HackClarify wants you to comment,share and subscribe.
People who will contribute to the site by sharing,Liking,commenting will be rewarded by Samin Yasar with tons of things Like , Cracked Content/Softwares , Hacking Tools, Un posted posts that will be posted in HackClarify later on and more VIA gmail account.
Plus: First Person with 100 comments will get Exclusive extra prizes. A whole Collection of Scripts and *SURPRISES*
Thank You.
Hope i get this done.
Regards,
Samin Yasar @hackclarify
Founder/Super Admin
Blogger
HackClarify
Read More Add your Comment 5 Replies
Hide Folders Not using any Software
Sometimes you want to lock folder to hide your personal files and personal data from other users of your computer. You will find many Softwares in market for folder lock but it wont always working properly or if it works properly then it wants Registration or needs a crack to use it for longer time.
1. Copy this below Code.
**********************************************************
cls
@ECHO OFF
title Folder Locker
if EXIST “Control Panel.{21EC2020-3AEA-1069-A2DD-08002B30309D}” goto UNLOCK
if NOT EXIST Locker goto MDLOCKER
:CONFIRM
echo **Folder Locker by http://hackclarify.blogspot.com**
echo ………………………………………………
echo Are you sure u want to Lock the folder(Y/N)
set/p “cho=>”
if %cho%==Y goto LOCK
if %cho%==y goto LOCK
if %cho%==n goto END
if %cho%==N goto END
echo Invalid choice.
goto CONFIRM
:LOCK
ren Locker “Control Panel.{21EC2020-3AEA-1069-A2DD-08002B30309D}”
attrib +h +s “Control Panel.{21EC2020-3AEA-1069-A2DD-08002B30309D}”
echo Folder locked
goto End
:UNLOCK
echo **Folder Locker by http://hackclarify.blogspot.com**
echo ………………………………………………
echo Enter password to Unlock folder
set/p “pass=>”
if NOT %pass%== type your password here goto FAIL
attrib -h -s “Control Panel.{21EC2020-3AEA-1069-A2DD-08002B30309D}”
ren “Control Panel.{21EC2020-3AEA-1069-A2DD-08002B30309D}” Locker
echo Folder Unlocked successfully
goto End
:FAIL
echo Invalid password
goto end
:MDLOCKER
md Locker
echo Locker created successfully
goto End
:End
echo Invalid password
goto end
:MDLOCKER
md Locker
echo Locker created successfully
goto End
:End
2. Then paste it to the notepad.
3. You will find “type your password here” in that code (Without quotes) so just write your password in place of “type your password here” (Without quotes).
4. Save this notepad as Locker.bat anywhere you wish
5. Then double click on Locker.bat.
6. when you double click on this it will create ‘Locker’ folder automatically there itself, After creating of this folder place the contents you want to lock inside the Locker Folder and run locker.bat again, So it will ask to lock this folder… So just type “y” (without quotes) then press enter. Your folder get disappeared that means you locked your folder. No one can see your files of your locked folder.
7. Now if you want to unlock folder then again double click on Locker.bat, It will ask your password so just enter password and then press enter, Your folder appears. If you have any problems, please let me know in the comments section.
Read More Add your Comment 4 Replies