The Content Provided on HackClarify are Only for Security Awareness & Educational Purposes Only, Hackclarify is Not Responsible for any Harm Done!
Place Your Ads Here By Requesting Using The Contact Form



Uninstall Programs Using CMD in Windows XP/Vista/7
I have been into situation when you install a software on a computer, its starts freezing and you are not able to work on the computer. Suddenly the CPU usage shoots to 100% and there is nothing to do but to restart computer. Then also situation remains the same and even not able lo launch Add/Remove wizard to uninstall the newly installed software which caused all the problem. This is where our old DOS shell comes in handy. I am going to tell you how we can uninstall a program using command prompt with few simple commands.
1. Click Start Menu.
2. Click All Programs.
3. Click Accessories and select Command Prompt.
4. When the command prompt is open, type wmic and press Enter.

5. Now type command: product get name and hit Enter. This command will populates a list of installed applications on your PC with complete name of an application.

6. Now type: product where name=” ” call uninstall and hit Enter (Note: Inside name” “ you have to write the exact name of software you wish to uninstall from the populated list. For an example VMware Tools).
Example: product where name=”VMware Tools” call uninstall

7. Type Y for confirming un-installation process then press Enter to uninstall the software completely.

This trick works on Windows XP Professional, Windows Vista, Windows 7, Windows Server 2003 and Windows Server 2008.
 Read More
Add your Comment
4
Replies
Read More
Add your Comment
4
Replies

Windows 8 to come with Bult in Malware Protection

At the company's BUILD conference in Anaheim, California on Tuesday, Corporate Vice President of Windows Planning and Ecosystem Michael Angiulo demonstrated an early version of Windows 8 that automatically scanned an infected USB drive used to boot the next generation operating system. Before the OS was able to load, the computer stopped the process and displayed a warning that the boot volume contained an "invalid signature" indicating it had been compromised.
He was able to get the valid version of Windows to load by turning off the system and turning it back on. The presentation starts around the 1:08 mark in the following video:
The technology making this possible is known as UEFI, short for Unified Extensible Firmware Interface. A successor to the BIOS ROM firmware that Microsoft operating systems have relied on since their beginning, UEFI was designed to shorten the time it takes a PC to start up. It was built by Intel, but is designed to work with a variety of CPU architectures.
"It's not just about speed and having a boot that looks better," Angiulo said during Tuesday's keynote, referring to UEFI. "It's about security, too."Steven Sinofsky, president of Microsoft's Windows and Windows Live division, went on to say that Windows 8 developers "have taken Defender and we've actually built a whole new range of protection, all the way up though antimalware, antivirus." Users are free to run Defender or security software supplied by another company. In all, the new OS will offer "tons of security features," he added.
The company issued a statement Wednesday saying Windows 8 would include "low-level security features such as Secured Boot to help defeat classes of threats, and user facing features including Windows Defender and SmartScreen" spam-filtering. The statement didn't elaborate.
Windows 8 will also offer a new way to log on to PCs equipped with a touchscreen. Sam Bowne, a security instructor at San Francisco City College, provided a screenshot here that describes the feature this way: "You choose the picture – and the gestures you use with it – to create a password that's uniquely yours."
Bowne and his students have been testing the security features in the new Windows beta, according to a source.
"There is built in antivirus, and it works!" he wrote "It stopped not only thr EICAR test file, but more than a dozen malware items in Metasploit. So it might be time to sell your Symantec stock."
Read More
Add your Comment
0
Replies
Network Forensic Analysis tool for Windows-Network Miner
 NetworkMiner is a Network Forensic Analysis Tool (NFAT) for Windows. NetworkMiner can be used as a passive network sniffer/packet capturing tool in order to detect operating systems, sessions, hostnames, open ports etc. without putting any traffic on the network. NetworkMiner can also parse PCAP files for off-line analysis and to regenerate/reassemble transmitted files and certificates from PCAP files.
NetworkMiner collects data (such as forensic evidence) about hosts on the network rather than to collect data regarding the traffic on the network. The main user interface view is host centric (information grouped per host) rather than packet centric (information showed as a list of packets/frames).
NetworkMiner can extract files and certificates transferred over the network by parsing a PCAP file or by sniffing traffic directly from the network. This functionality can be used to extract and save media files (such as audio or video files) which are streamed across a network from websites such as YouTube. Supported protocols for file extraction are FTP, TFTP, HTTP and SMB.
NetworkMiner has, since the first release in 2007, become popular tool among incident response teams as well as law enforcement
The new version supports features such as:
- Extraction of Google Analytics data
- Better parsing of SMB data
- Support for PPP frames
- Even more stable than the 1.0 release
NetworkMiner_1-1.zip
Read More
Add your Comment
0
Replies
Use Gmail on Windows Mail.
This is a trick for Windows Vista’s Windows Mail. Using your Gmail account.
1. First, you need a gmail account. Its probably the best free email service out thier… why not sign up! Go here to sign up!
2. Once you sign up, while in you gmail inbox click the Settings link in the upper-right hand corner of your browser.
- In the settings menu click the tab that says: Forwarding and POP/IMAP
 - Make sure POP is enabled, like shown in the screen shot above. If it is not, click “Enable POP for all mail” and click save. When you click save it will take you back into your inbox.
3. Now, in Vista open Windows Mail.
-In Windows Mail, click Tools in the menu can choose accounts…

4. When the window “Internet Accounts” comes up, on the right click the Add… button
5. Choose Email Account in the list.
6. Enter you name.
7. put you gmail email address: yourusername@gmail.com
8. Choose POP3 from the drop-down menu.
-For the incoming server write: pop.gmail.com
-For the outgoing email server write: smtp.gmail.com
* Then check mark the box on the bottom of that window that says: This Server requires authentication.
 9. Click Next.
10. For email user name type in your Gmail address. example: yourusername@gmail.com
11. Then type your Gmail password, and hit next.
12. Check mark the box: Do not download my emails at this time, and click Finish.
13. When the windows closes, the windows “Internet Accounts” should show.
14. In that window, highlight your pop.gmail.com account, and click the Properties button on the side.
15. Click the Advanced tab in the window.
16. Check mark This Server requires secure connection (SSL)
- Also check mark This Sever requires secure connection (SSL) under the Incoming Mail (POP3) as well.
17. Then where it says Outgoing Mail (STMP): Type the numbers: 465
Then where it says Incoming Mail (POP3): Type the numbers: 995
It should look like this:
 Now click okay, and click send/receive mail. And your done!
Hope that works for you, and thanks for reading!
1. First, you need a gmail account. Its probably the best free email service out thier… why not sign up! Go here to sign up!
2. Once you sign up, while in you gmail inbox click the Settings link in the upper-right hand corner of your browser.
- In the settings menu click the tab that says: Forwarding and POP/IMAP
Click to See full size
3. Now, in Vista open Windows Mail.
-In Windows Mail, click Tools in the menu can choose accounts…
4. When the window “Internet Accounts” comes up, on the right click the Add… button
5. Choose Email Account in the list.
6. Enter you name.
7. put you gmail email address: yourusername@gmail.com
8. Choose POP3 from the drop-down menu.
-For the incoming server write: pop.gmail.com
-For the outgoing email server write: smtp.gmail.com
* Then check mark the box on the bottom of that window that says: This Server requires authentication.
Click to see larger view
10. For email user name type in your Gmail address. example: yourusername@gmail.com
11. Then type your Gmail password, and hit next.
12. Check mark the box: Do not download my emails at this time, and click Finish.
13. When the windows closes, the windows “Internet Accounts” should show.
14. In that window, highlight your pop.gmail.com account, and click the Properties button on the side.
15. Click the Advanced tab in the window.
16. Check mark This Server requires secure connection (SSL)
- Also check mark This Sever requires secure connection (SSL) under the Incoming Mail (POP3) as well.
17. Then where it says Outgoing Mail (STMP): Type the numbers: 465
Then where it says Incoming Mail (POP3): Type the numbers: 995
It should look like this:
Click to see larger image
Hope that works for you, and thanks for reading!
Read More
Add your Comment
0
Replies
Be Dynamic with Launchy Keystroke Launcher
 Launchy, previously mentioned as a Windows start menu alternative, is a powerful keystroke based launcher for your Windows computer. Using Launchy, you can start programs, view files and folders, access bookmarks and perform other such tasks.
In this post, I’ll talk about how you can use Launchy to stay more productive throughout the day. Trust me, once you get the hang of it, you’ll never touch icons or your start menu again. It just rocks. Before you go about using it, let’s have a look at some basic configuration options that you can alter to make Launchy work better for you.
Installation and Basic Configuration
Just grab the installer from the Sourceforge page, install Launchy and if the installation went smoothly – chances are you won’t see anything new. No system tray icon. No visible windows. Yup, nothing really. Until you press the ALT + SPACE keys together.

You can now right click on the Launchy box and configure Launchy’s behaviour by going to Options. Keep the first option checked if you want Launchy to be shown all the time. I wouldn’t recommend it though, since it’d interrupt your use of other applications/windows. You can, of course, modify the shortcut key to anything you wish – just modify the Hotkey option.
You can also set the transparency levels from the GUI Options. Launchy also provides alternate suggestions if you typed an unknown program name, you can set how many such items should be displayed.
From the Skins tab, you can choose from a number of skins for Launchy to make it blend with your desktop. User-created skins are available on DeviantArt.com and also from the Sourceforge forum.
Configure Indexing
Launchy needs to index your programs before you can actually use it. By default, Launchy indexes your Start Menu folder since most programs are present there. However, if you want to be able to launch your programs or files, you need to tell Launchy where they’re present.

To do this, use the Catalog tab and use the + button to add your commonly used directories to the Launchy index. You also need to specify what files need to be indexed – you might want your music files indexed, but not your .dll files. You can specify using the File Types box.
By checking the Executables option, you’re telling it to index all .exe files (these are generally software programs installed on your computer).
When you’re done with that, just click Rescan Catalog and now Launchy should have got all your program and files info into your index. Pretty quick too!
Using Launchy

Let’s take off with Launchy. First, just press the default hotkey combination. If you’ve modified the hotkey using the settings, press the ones that you’ve opted for. The launch window should popup.

launchy_scrn2
In case you typed something and some other program instead of the program you intended to start shows up, just use the “down arrow” key for more programs that match your keyword. For instance, I typed Windows and it showed multiple suggestions.
Launchy can also be used as a simple calculator and it can peform basic arithmetic operations.
Portable Launchy
If you’ve got a USB drive and it’s loaded with portable apps, then the portable version of Launchy is something you shouldn’t miss to check out. Just activate the Portable Mode option from the Options dialog (please see the first screenshot in this post).
Then, copy the Launchy folder from C:\Program Files and put it on your USB Drive. Launchy will now store its configuration files in your thumb drive and will act as a portable launcher.
Plugins
Launchy supports plugins, and a few basic plugins are already present and can be activated. For instance, the Weby plugin indexes your Firefox and IE bookmarks so that you can open them quickly from Launchy.

You might find some more useful plugins for Launchy here.
Read More
Add your Comment
0
Replies
Improve your Windows Laptop Battery Life

1. Use Windows power plans (schemes)
Begin with the most aggressive battery-saving options and customize the power plan as you go. In Windows 7, start with "Maximum Battery Life" and adjust the settings to your preferences. These settings will tell Windows to adjust the brightness when running on battery, when to dim the display, when to turn off the display, and when to put the computer to sleep.

2. Advanced power settings
While adjusting power plans, click on "Change advanced power settings" and set the period of inactivity before Windows turns off the hard disk. Also, enable hibernation so when you walk away from your laptop for an extended period of time, your laptop will turn off. Hibernation differs from sleep in that hibernation saves your work to the hard disk and actually shuts off the computer. Sleep saves your work to RAM and turns off the display and hard disk, but draws more power so it can be quickly resumed. We recommend experimenting with the other advanced settings to get the best results for your needs.

3. Disable networking
If you're not using Bluetooth or Wi-Fi, turn them off. Most laptops either have a physical button or a key combination that will allow you to quickly enable or disable them. If your laptop doesn't have a shortcut button, the Windows Key + X keyboard shortcut will bring up the Windows Mobility Center. The WMC provides quick access to some mobile settings, including Wi-Fi.

4. Reduce CPU usage
Turn off automatic tasks and programs to keep the processor from running things you don't need. A really good program for disabling startup programs is called AutoRuns for Windows. You can also use MSConfig, which is already included with Windows. Just type "msconfig.exe" in the search box of Windows Vista/7 or in the run box of Windows XP.

Also, try to keep the laptop's vents clear of dust or other obstructions so the processor doesn't overheat. Blankets and pillows are notorious for overheating a laptop, so try to find a flat surface to use your laptop on. If the CPU overheats, the laptop will use more power to run the fans that cool it.
5. Reduce hard disk usage
The more your laptop's hard disk has to work, the more power it will have to use. Defragging the hard disk will reduce the time it takes to find files, thus minimizing disk usage. Also, to prevent your system from using the hard disk for virtual memory, consider maxing out the memory in your laptop. Lastly, if you can afford it, consider upgrading to an SSD drive. An SSD drive consumes less power than standard hard-disk drives, weighs less, and will also give your laptop a considerable performance boost.

6. Battery maintenance tips
About every 2 months, try to clean the metal contacts on the battery and your laptop with a cotton swab and rubbing alcohol. This will help prevent dirt and corrosion from affecting battery performance. If you own a laptop with a NiMH battery, recalibrate the battery every now and then by letting the battery run all the way down, then charging it all the way up. Lithium ion batteries don't have the same memory effects as nickel metal hydride batteries so there's no need to condition one. In fact, manufacturers encourage users to top off a lithium ion battery frequently and to avoid completely discharging it.

7. Optical drives and USB ports
If you have an optical drive in your laptop, disable it in Device Manager. Optical drives, even when they're not spinning discs, are power hogs. If you want to watch movies on your laptop, try getting a digital copy onto your hard drive instead. Watching a movie directly from the hard disk uses less power than watching a DVD from the optical drive. Finally, avoid using expansion slots or USB ports, when trying to conserve battery life. Remove all unused peripherals, including external hard drives, keyboards, and mice, which all draw power from your laptop.

That's it. The next time you're in class, at a meeting, or sitting in an airplane, keep these battery-saving tips in mind. Better yet, implement some or all of these tips beforehand, so you'll be ready to go.
Read More
Add your Comment
0
Replies
Make Your Windows OS Faster with TuneUp Utilities

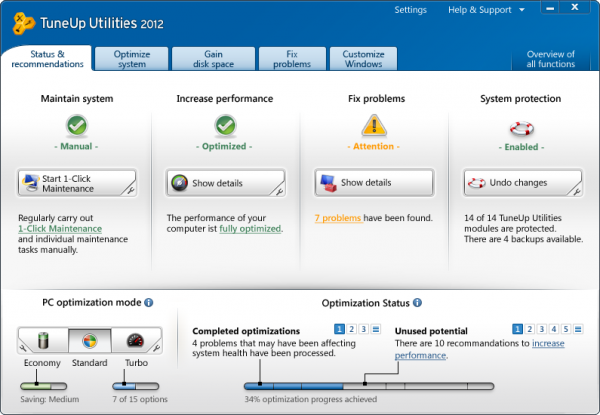
TuneUp Utilities 2012 can make your Windows operating system faster, more comfortable and more secure with just a few mouse clicks. And all operations performed on the operating system are completely safe, because all changes are monitored by TuneUp Rescue Center and can be undone at any time. All Utilities modules can be accessed through a common interface that is divided into six categories.
The software helps both beginners and experts to make Windows meet their needs in a way that is better, easier and safer. All important system options are explained in an easy way and can be turned on or off at the click of your mouse. TuneUp Utilities will then make the necessary changes in the registry or boot files automatically. We place a high value on system stability, so that Windows won't stop working reliably. And most changes that you make can be undone in TuneUp Rescue Center - easily and safely.
Download TuneUp Utilities 2012 Full Version + Serial Number FreeTuneUp Utilities automatically runs important maintenance tasks for you, makes you aware of any problems and offers simple solutions. This ensures performance is always at its best. A slow and untidy computer is now a thing of the past for you. You can also use TuneUp to customize the appearance of your Windows system - to make working on your computer more enjoyable.
With TuneUp you will quickly make your Windows system faster and more convenient to use- and ensure that it stays like this for the long term. This makes Utilities the perfect program for everyone: for those who would rather leave the computer maintenance to a reliable partner as well as for those who would rather do everything themselves.
The TuneUp Turbo Mode provides an immediate performance boost whenever you need it. When you use your computer in the TuneUp Turbo Mode, an analysis is performed to see which tasks, programs and functions are currently running in the background that are not strictly necessary. These programs are stopped or slowed down, allowing the additional processing power gained to be used exclusively by the programs you are actually running with TuneUp Utilities 2012
Download uneUp Utilities 2012
here
For Serial:
CQNJ26-KHV5T4-6VYR8M-CX7V7P-976P6B-DRFWTC
-----
JEVMNF-HKDQAM-W360BE-3BA2B7-QT1Y4F-REBDDT
-----
F0REMY-N5J4PH-FNRXPC-22ETQ9-MTJN28-16DW47
-----
J26DN0-HN06B1-52C8BT-D0AA4Y-VA319K-5NAAJ1
More Serials!!
Filename::Tune Up Utilities 2012 Full + Serial
Extension:RAR
Size:: 25.42 MB
From Media Fire
http://www.mediafire.com/?x19c8yip34ly9hc
From UpLoadorb
Read More
Add your Comment
0
Replies
RemoveThe "Windows Genuine Notification" in Windows 7
Today! i will show you on how to remove windows genuine validation notice or simply removing WAT,because its quite annoying to see this stupid notification. As we know that if we install a pirated copy of windows 7 then after sometime if your internet connection is active the desktop background gets black and a notification pops up after every few minutes saying:
Its much annoying. So i am providing a software in order to remove such notifications.
First of all download the software below: ( Skip add at the top right corner to go to download link)
DOWNLOAD WAT REMOVAL SOFTWARE
 So click the "Remove WAT" button. Now, you are done.
Reboot the system and all those notifications are gone.
"VALIDATE COPY OF WINDOWS"
Its much annoying. So i am providing a software in order to remove such notifications.
First of all download the software below: ( Skip add at the top right corner to go to download link)
DOWNLOAD WAT REMOVAL SOFTWARE
After downloading the software run it. A window like below will popup at your screen:

Reboot the system and all those notifications are gone.
Hope i helped. Please Comments,Share & Sub via email.
Read More
Add your Comment
0
Replies
Share internet connection in windows 7 with built in WiFi

Hey, do you want to share your internet connection with colleagues or friends without wireless router, lan wire etc ? Then here is the perfect solution for windows 7 users. Because windows 7′s ICS technology is better than any OS in the market. You can easily turn your wifi enabled laptop/pc into professional wireless router. Do you think I’m joking :-p ? Well, the process is tested and it’s working 100%. Just follow up the process mentioned below :
1. Go to Control Panel > Network and Internet > Network and Sharing Center 2. Under Change your networking settings, click Set up a new connection or network
3. Select Set up a wireless ad hoc (computer-to-computer) network
4. Enter your Network name, and enter a Security key if wanted
5. Check the box for Save this network and click Turn on Internet connection sharing on next pageYour internet connection is now ready for sharing. Tell your friends to connect with your wifi network via their wifi. It’ll work 100% if you didn’t mess around with your internet connections before. Sometimes, your friends can be able to connect your wifi but only local connection without internet access. It’s because you didn’t turn on the internet sharing function mentioned in point 5. For some technical reasons the internet sharing activating window doesn’t appear for the first time. If this happens follow the instruction given below (don’t do it unless you face such problem):
1) Open Network and Sharing Center

2) Go to Change Adapter Settings

3) Find the adapter for the default internet connection (it was a PPPOE in my case)

4) Right click on that -> Cancel as Default Connection

5) Right click -> Properties -> Sharing tab

6) Uncheck "Allow other network users to connect ..." if it is not

7) Setup the ad-hoc as cocaine explained in the previous post, the Turn on Internet connection sharing should appear
Oh, I almost forgot to tell that Internet Sharing won’t work unless you’ve a wifi enabled laptop. PCs don’t have any built in wifi. But don’t worry, you can buy a portable wifi for PC from your nearest shop.
So, then I hope you’ll not face any problem after my detail tutorial. But don’t worry, I’m not running away ! If you still face any problem, don’t hesitate to ask...just by leaving comments.
Read More
Add your Comment
0
Replies