The Content Provided on HackClarify are Only for Security Awareness & Educational Purposes Only, Hackclarify is Not Responsible for any Harm Done!
Place Your Ads Here By Requesting Using The Contact Form


Use Gmail on Windows Mail.
This is a trick for Windows Vista’s Windows Mail. Using your Gmail account.
1. First, you need a gmail account. Its probably the best free email service out thier… why not sign up! Go here to sign up!
2. Once you sign up, while in you gmail inbox click the Settings link in the upper-right hand corner of your browser.
- In the settings menu click the tab that says: Forwarding and POP/IMAP
 - Make sure POP is enabled, like shown in the screen shot above. If it is not, click “Enable POP for all mail” and click save. When you click save it will take you back into your inbox.
3. Now, in Vista open Windows Mail.
-In Windows Mail, click Tools in the menu can choose accounts…

4. When the window “Internet Accounts” comes up, on the right click the Add… button
5. Choose Email Account in the list.
6. Enter you name.
7. put you gmail email address: yourusername@gmail.com
8. Choose POP3 from the drop-down menu.
-For the incoming server write: pop.gmail.com
-For the outgoing email server write: smtp.gmail.com
* Then check mark the box on the bottom of that window that says: This Server requires authentication.
 9. Click Next.
10. For email user name type in your Gmail address. example: yourusername@gmail.com
11. Then type your Gmail password, and hit next.
12. Check mark the box: Do not download my emails at this time, and click Finish.
13. When the windows closes, the windows “Internet Accounts” should show.
14. In that window, highlight your pop.gmail.com account, and click the Properties button on the side.
15. Click the Advanced tab in the window.
16. Check mark This Server requires secure connection (SSL)
- Also check mark This Sever requires secure connection (SSL) under the Incoming Mail (POP3) as well.
17. Then where it says Outgoing Mail (STMP): Type the numbers: 465
Then where it says Incoming Mail (POP3): Type the numbers: 995
It should look like this:
 Now click okay, and click send/receive mail. And your done!
Hope that works for you, and thanks for reading!
1. First, you need a gmail account. Its probably the best free email service out thier… why not sign up! Go here to sign up!
2. Once you sign up, while in you gmail inbox click the Settings link in the upper-right hand corner of your browser.
- In the settings menu click the tab that says: Forwarding and POP/IMAP
Click to See full size
3. Now, in Vista open Windows Mail.
-In Windows Mail, click Tools in the menu can choose accounts…
4. When the window “Internet Accounts” comes up, on the right click the Add… button
5. Choose Email Account in the list.
6. Enter you name.
7. put you gmail email address: yourusername@gmail.com
8. Choose POP3 from the drop-down menu.
-For the incoming server write: pop.gmail.com
-For the outgoing email server write: smtp.gmail.com
* Then check mark the box on the bottom of that window that says: This Server requires authentication.
Click to see larger view
10. For email user name type in your Gmail address. example: yourusername@gmail.com
11. Then type your Gmail password, and hit next.
12. Check mark the box: Do not download my emails at this time, and click Finish.
13. When the windows closes, the windows “Internet Accounts” should show.
14. In that window, highlight your pop.gmail.com account, and click the Properties button on the side.
15. Click the Advanced tab in the window.
16. Check mark This Server requires secure connection (SSL)
- Also check mark This Sever requires secure connection (SSL) under the Incoming Mail (POP3) as well.
17. Then where it says Outgoing Mail (STMP): Type the numbers: 465
Then where it says Incoming Mail (POP3): Type the numbers: 995
It should look like this:
Click to see larger image
Hope that works for you, and thanks for reading!

Access Windows Files from Ubuntu Dual Boot
Alright, this is for the people who have a dual-boot with their Windows and Ubuntu machine, commonly done through the program called Wubi.
Wubi is an Ubuntu installer which installs Ubuntu in a safe mode or whatever.
How to Install Ubuntu - Dual Boot Method with Windows OS
Once you install and get going in Ubuntu, a lot of us come to wonder, how do i get to my Windows files? Their on the same hard disc (most of the time, unless you choose to install it on another disc upon installation) so you should be able to access those files, right? Yes indeed. Its very easy in fact.
1. In Ubuntu, click on Places from the Upper right hand drop down menu. Then choose Computer.

2. Now once your in Computer, click on the icon that says ‘Filesystem’ it is equivalent to clicking on your Local Disk (or whatever you have named your main hard drive) on the Windows Operating System.

3. Now that your in your Filesystem find the folder that says ‘host’. This is your Windows hard disk files.

4. Now you are in your Windows files! Cliking on ‘host’ in Ubuntu dual-boot is similar to clicking on your hard drive icon when you are in (My) Computer in Windows.
5. If you wish to get to something like your music, you will have to look for your user file, then click on your name.
So, under ‘host’ click:
Users>[Your User Name]>Music (Note, if you are using Windows XP, you will have to go: Users>[Your User Name]>My Documents>My Music
I hope that helped you guys. This is just a simple trick for people who don’t know this. Thanks for reading!
Any more questions? Leave a comment in this tutorial bellow!
INFO: version of Ubuntu in this tutorial: Ubuntu 9.10
Wubi is an Ubuntu installer which installs Ubuntu in a safe mode or whatever.
How to Install Ubuntu - Dual Boot Method with Windows OS
Once you install and get going in Ubuntu, a lot of us come to wonder, how do i get to my Windows files? Their on the same hard disc (most of the time, unless you choose to install it on another disc upon installation) so you should be able to access those files, right? Yes indeed. Its very easy in fact.
1. In Ubuntu, click on Places from the Upper right hand drop down menu. Then choose Computer.
2. Now once your in Computer, click on the icon that says ‘Filesystem’ it is equivalent to clicking on your Local Disk (or whatever you have named your main hard drive) on the Windows Operating System.
3. Now that your in your Filesystem find the folder that says ‘host’. This is your Windows hard disk files.
4. Now you are in your Windows files! Cliking on ‘host’ in Ubuntu dual-boot is similar to clicking on your hard drive icon when you are in (My) Computer in Windows.
5. If you wish to get to something like your music, you will have to look for your user file, then click on your name.
So, under ‘host’ click:
Users>[Your User Name]>Music (Note, if you are using Windows XP, you will have to go: Users>[Your User Name]>My Documents>My Music
I hope that helped you guys. This is just a simple trick for people who don’t know this. Thanks for reading!
Any more questions? Leave a comment in this tutorial bellow!
INFO: version of Ubuntu in this tutorial: Ubuntu 9.10
16 Tips & Tricks For Ubuntu Users

1. Get lightning fast and clever at the command line
You can use keyboard shortcuts and other command line tricks to make entering commands easier and faster. You might already know about the ‘tab’ key which completes partial commands and even file and directory names.
Here are some other keyboard shortcuts you can use within terminal:
| Ctrl-a | Move to the start of the line. |
| Ctrl-e | Move to the end of the line. |
| Alt-] x | Moves the cursor forward to the next occurrence of x. |
| Alt-Ctrl-] x | Moves the cursor backwards to the previous occurrence of x. |
| Ctrl-u | Delete from the cursor to the beginning of the line. |
| Ctrl-k | Delete from the cursor to the end of the line. |
| Ctrl-w | Delete from the cursor to the start of the word. |
| Ctrl-y | Pastes text from the clipboard. |
| Ctrl-l | Clear the screen leaving the current line at the top of the screen. |
| Ctrl-x Ctrl-u | Undo the last changes. Ctrl-_ |
| Alt-r | Undo all changes to the line. |
| Alt-Ctrl-e | Expand command line. |
| Ctrl-r | Incremental reverse search of history. |
| Alt-p | Non-incremental reverse search of history. |
| !! | Execute last command in history |
| !abc | Execute last command in history beginning with abc |
| !n | Execute nth command in history |
| ^abc^xyz | Replace first occurrence of abc with xyz in last command and execute it |
2. Launch Ubuntu Linux Applications with keyboard
There are two ways you can achieve this:
- Use applications like Launchy or Gnome-Do that make it easier to launch applications by typing a few characters of the application’s name.
- Or you can summon gconf editor (Alt+F2 then type gconf-editor and hit enter), and navigate to apps > metacity > global_keybindings, double click on any of the run_command_N and type in the keyboard shortcut you want to assign to an application then make a mental note of the number N. Then go to apps > metacity > keybinding_commands and double click on command_N (N being the number you used above) and type in the command you want to run. As an example if you wanted to run Firefox you would type in firefox.


3. Start from wherever you left off

You can make Ubuntu remember the applications you had open when you last logged out, so that when you log back in again you’ll find all those applications running and you can resume right from where you left off.
To achieve this go to System > Preferences > Startup Applications, then go to the options tab and check "Automatically remember running applications when logging out"
4. Create a Separate Ubuntu Linux Home Partition

New versions of Ubuntu arrive every 6 months. Although you can upgrade to the latest version via the update manager, sometimes the upgrade doesn’t work as expected so some users like to do a fresh clean install.
The disadvantage with that of course is that you lose data you had in your home directory. To overcome this you can create a separate Home partition when you are installing Ubuntu, size it according to your requirements and then when you decide to install Ubuntu the next time, simply specify this partition as the Home partition (by choosing /home as the mount point).
All your files and data on the Home partition will be preserved even after a fresh install.
5. Update and Install Ubuntu Linux Software Without Internet Connection

Note that APTonCD requires you to have an internet connection (or downloaded packages) to create the installed media. However once the media is ready you don’t need an internet connection for any of the machines you want to install the software on. Insert the appropriate CD/DVD and use apt-get as you would normally.
6. Install new fonts, Microsoft fonts and improve font rendering

Ubuntu doesn’t offer many choices when it comes to the fonts. However you can easily install new fonts including those from Microsoft like Arial, Verdana, impact and many more. You can use different sites to find the kind of font you are looking for.
7. Use PPAs, Install latest versions of software
There are a lot of steps that a software has to go through before it becomes part of Ubuntu or becomes available through the Ubuntu repositories. While all those steps lend additional stability, it generally means that you don’t get the latest versions of all the software as soon as they are released.
If you like to stay on the cutting edge, you can search for Personal Package Archives for your favorite software on Launchpad and add those to your installation’s software sources. I briefly touched on PPAs and how to use them here. If that seems like too much work, you can also download the latest deb packages and install them by double clicking (you won’t get automatic updates for the software if you install it this way).
Remember you might get into an occasional trouble or two with the latest versions, but mostly it wouldn’t be catastrophic. You can always hop over to the Ubuntu Forums to get quick help.
8. Be the root
The root account is disabled by default on Ubuntu installations, mainly to prevent you from doing something you didn’t intend to do. However if you "promise to be careful" you can enable root account as follows:

1. Type sudo passwd root and provide a root password.
2. Then head on over to System > Administration > Login Window, go to the Security tab and check "Enable local system administrator login"
You should now be able to login as root from the Login prompt. As an alternative you can use "sudo su" to provide your password and get root prompt.
9. Run Windows applications and games

Who wouldn’t like to play Counter Strike on Ubuntu (unless of course you are completely not into it) or perhaps even run Photoshop?
10. Shorten boot time with profiling
Ubuntu Linux devs have done a great job with the boot time, Jaunty is fast and Karmic is slotted to be even faster. There is however a bit more you can do by profiling your boot. Profiling lets Ubuntu make a list of all the files that are accessed during bootup, it then sorts the files according to how they are stored on your hard disk. So the next time the system is booted, the files would be read faster.
To profile boot you need to follow these steps
* At the grub menu highlight the kernel you boot most often.
* Press e for edit.
* Choose the line starting with kernel and press e again. Now add the word profile to the end of this line. Hit Enter and then press b to boot
Note that while profiling, the system will boot slower this one time, the next time however you should see an improvement. Also keep in mind that all this is machine-dependent and also depends on the arrangement of files on your hard disk, so the difference you see might not be huge, or even nil in some cases.
11. Try out different Ubuntu Linux Desktop Environments and Desktop Managers
If you are looking for something different than the default Gnome interface, you should check out alternative desktop managers that you can use. If it is a complete Desktop Environment you are looking for, KDE4 has come a long way and is now impressively usable and fun. You can do a "sudo apt-get install kubuntu-desktop" to get KDE.
12. Create a media center or a media server

It would be great if you could easily browse and manage your huge collection of music, videos and pictures. Mesmerized by Windows Media Center’s slick interface? Wait till you see what all cool options you have to turn your Ubuntu system into a media center. You can even access your media collection on your phone, PSP or a different computer if you set up a media server on your Ubuntu machine.
13. Share Firefox profile data with Windows
Many people use Windows and Linux on the same machine. If you are one of them, there would have been times you couldn’t find that bookmark you created or password you stored when you were using Firefox from within Windows. For different computers you can of course use Weave.
14. Customize Nautilus to your liking

Nautilus is the default file manager on Ubuntu. While you may be content with what it does, there is lots more you can make it do. You can use extensions to improve functionality and even add custom functionality to Nautilus
15. Compile your own Kernel
If you can’t find something to keep you busy for the weekend and you have your customization hat on, how about building a kernel to specifically meet your requirements? This is frankly more of a learning experience. Some might say that it enables you to use just the features and drivers you require, but if everything is working fine with the kernel supplied and you don’t have any interest in the Linux kernel, skip ahead this one is not for you.
If however you require some of the experimental features of the kernel, or need it to be compiled in some other special way we say you check out this guide within Ubuntu Documentation.
16. Change Usplash Screen and create a custom splash screen for GRUB

If you would like to change that to something more interesting What better way to show your Linux fu than customizing the very first screen that appears? You can create a custom splash screen using one of your photos, GIMP and a little tweaking. Google for Better Results!
Know some more tips or great hacks for Ubuntu Linux users? Sure you do, go ahead let us know about them in the comments.
Backup Your Computer running on Linux OS
Linux gives you plenty of control over your computer, but with great power comes great responsibility. That means backing up your files regularly (among other things), and while cloud storage is attractive, for many of us, it's not enough. Here's how to back up your data (note: I am using Ubuntu, so the details may differ somewhat if you use a different distribution):
Related :10 Most Useful & Powerful Hacking & Security Tools for LINUX
Also Read: 5 Free Open Source Linux Remote Desktop Softwares
1. From the search bar, just type "backup" to bring up preinstalled options. I'll be using Simple Backup Suite.
2. From the first tab (General), tell Linux how often you want to perform a complete back up and what format, if any, to use for compression.

Step 2: General tab.
3. Select the Include tab to add files and directories. The default is pretty good for most users, but you may have some files hidden away that deserve to be backed up, so be thorough! You only have to do this once.
4. Select the Exclude tab if you want to keep some files or subfolders from being archived. There's no special reason to do this unless you're trying to save space (or you're a bit compulsive).
5. Make sure to select the Destination tab to pick your storage location. As with any other backup, you'll want it to be as secure as possible. A network location is probably best, though your needs may vary.

Step 5: Destination tab.
6. The Schedule tab lets you set a schedule to do incremental backups of files that have changed since the last backup. This happens in the background and shouldn't interrupt your day-to-day work.
7. Click the disk icon at the top to save your settings, then click the drive icon to back up your files. The first one will take a while, most likely, as will future complete backups, so you may want to schedule them for downtimes.
That's it. Once you've worked through this, the only reason you'd need to revisit the tool is to change the frequency, location, or contents of your backups. Do it as soon as you can--even Linux can't protect you from disk failure!
Related :10 Most Useful & Powerful Hacking & Security Tools for LINUX
Also Read: 5 Free Open Source Linux Remote Desktop Softwares
1. From the search bar, just type "backup" to bring up preinstalled options. I'll be using Simple Backup Suite.
2. From the first tab (General), tell Linux how often you want to perform a complete back up and what format, if any, to use for compression.
Step 2: General tab.
3. Select the Include tab to add files and directories. The default is pretty good for most users, but you may have some files hidden away that deserve to be backed up, so be thorough! You only have to do this once.
4. Select the Exclude tab if you want to keep some files or subfolders from being archived. There's no special reason to do this unless you're trying to save space (or you're a bit compulsive).
5. Make sure to select the Destination tab to pick your storage location. As with any other backup, you'll want it to be as secure as possible. A network location is probably best, though your needs may vary.
Step 5: Destination tab.
6. The Schedule tab lets you set a schedule to do incremental backups of files that have changed since the last backup. This happens in the background and shouldn't interrupt your day-to-day work.
7. Click the disk icon at the top to save your settings, then click the drive icon to back up your files. The first one will take a while, most likely, as will future complete backups, so you may want to schedule them for downtimes.
That's it. Once you've worked through this, the only reason you'd need to revisit the tool is to change the frequency, location, or contents of your backups. Do it as soon as you can--even Linux can't protect you from disk failure!
How to Install Fonts on Ubuntu
For Red Hat Liberation fonts use this terminal line: (This fonts are already installed on Ubuntu 10.04)sudo apt-get install ttf-mscorefonts-installer
If you want to install any other fonts you can get from the net or use your font database follow this steps:sudo apt-get install ttf-liberation
- Go to your home folder
- Enable “Show Hidden Files” option from Nautilus View menu
- Then create new folder with name “.fonts” (with dot in front)
- Now in new folder copy all your true type fonts. If you want to copy your Windows fonts, you can find it in WINDOWS/Fonts folder.
- Now restart and new fonts will be in use.
Remove Hard Drive Icons from Ubuntu Desktop

Often we get teased due to the hard drive partitions icons shown at the desktop of the ubuntu, Well i am posting a small trick on how to hide this,
Step 1:
Press Alt+F2 and a dialog box will appear like this:

Type gconf-editor into the box, Like this:

Press Run and A window will appear.Its Configuration Editor. Browse to apps > nautilus > desktop.
Step 4:
"volumes_visible" will be ticked like this:

Untick "volumes_visible" and close the window.
Cheers, the drive icons would then disappear from the desktop. Remember that you can always access the drives from "Places".
How to install Ubuntu on a seperate partition to dual boot with Windows

Step by step guide on how to install Ubuntu 8.10 on a separate partition to dual boot with windows. Please Join our Network to learn More hackclarify.grou.ps
How to remove Ubuntu 8.10:
1. Right click Computer and select Manage.
2. Right click on the Ubuntu Partition, select delete volume and do the same for the swap area partition.
3.Right click on the windows partition, and select extend volume and click next so windows claims back the former swap and ubuntu partitions.
However this will prevent Windows from booting up as the GRUB boot loader is still installed.
To remove the GRUB loader (windows xp)
1.Insert your Windows installation disc, restart the machine, and on start up boot from the disc.
2. After setup files have been loaded press R to select the repair option
3. Type 1 then press enter to select your windows installation
4. Type in your administrator password
5 .Type FIXMBR and press enter. Press Y to confirm.
6.Type EXIT, press the enter key to restart your machine and remove the install disc.
Ubuntu is now removed along with GRUB loader, you are left with your windows xp installation.
To remove the GRUB loader (windows vista)
1.Insert your Windows installation disc, restart the machine, and on start up boot from the disc.
2. Select your language and keyboard.
3. Click Repair your computer
4. Click Command Prompt
5. In command prompt type Bootrec.exe /FixMbr and press enter.
6.Restart your machine & remove the install disc.
Ubuntu is now removed along with GRUB loader, you are left with your windows installation.
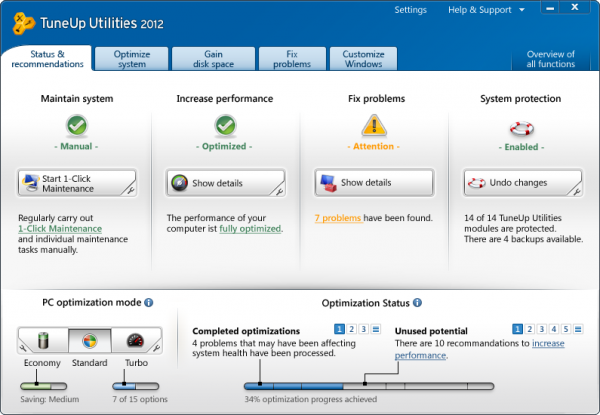
Make Your Windows OS Faster with TuneUp Utilities
")
TuneUp Utilities 2012 can make your Windows operating system faster, more comfortable and more secure with just a few mouse clicks. And all operations performed on the operating system are completely safe, because all changes are monitored by TuneUp Rescue Center and can be undone at any time. All Utilities modules can be accessed through a common interface that is divided into six categories.
The software helps both beginners and experts to make Windows meet their needs in a way that is better, easier and safer. All important system options are explained in an easy way and can be turned on or off at the click of your mouse. TuneUp Utilities will then make the necessary changes in the registry or boot files automatically. We place a high value on system stability, so that Windows won't stop working reliably. And most changes that you make can be undone in TuneUp Rescue Center - easily and safely.
Download TuneUp Utilities 2012 Full Version + Serial Number FreeTuneUp Utilities automatically runs important maintenance tasks for you, makes you aware of any problems and offers simple solutions. This ensures performance is always at its best. A slow and untidy computer is now a thing of the past for you. You can also use TuneUp to customize the appearance of your Windows system - to make working on your computer more enjoyable.
With TuneUp you will quickly make your Windows system faster and more convenient to use- and ensure that it stays like this for the long term. This makes Utilities the perfect program for everyone: for those who would rather leave the computer maintenance to a reliable partner as well as for those who would rather do everything themselves.
The TuneUp Turbo Mode provides an immediate performance boost whenever you need it. When you use your computer in the TuneUp Turbo Mode, an analysis is performed to see which tasks, programs and functions are currently running in the background that are not strictly necessary. These programs are stopped or slowed down, allowing the additional processing power gained to be used exclusively by the programs you are actually running with TuneUp Utilities 2012
Download uneUp Utilities 2012
here
For Serial:
CQNJ26-KHV5T4-6VYR8M-CX7V7P-976P6B-DRFWTC
-----
JEVMNF-HKDQAM-W360BE-3BA2B7-QT1Y4F-REBDDT
-----
F0REMY-N5J4PH-FNRXPC-22ETQ9-MTJN28-16DW47
-----
J26DN0-HN06B1-52C8BT-D0AA4Y-VA319K-5NAAJ1
More Serials!!
Filename::Tune Up Utilities 2012 Full + Serial
Extension:RAR
Size:: 25.42 MB
From Media Fire
http://www.mediafire.com/?x19c8yip34ly9hc
From UpLoadorb
Dual Boot Method for Backtrack5 with Windows

Lets start the tutorial, it quite much easy and will require similar previous technique as we have used while making setup of backtrack 5 in USB disk.
Creating A dual boot for Windows and Linux (Backtrack 5):-
The theme is this that you have already installed windows Seven, Vista or else Xp and you want to create a dual boot of Backtrack and Windows (Dual Boot Means:- It will prompt you in startup that whether you want to use Windows or else Linux). For this you will just choose a different option during backtrack 5 installation or else in any other Linux too. So, what is this option lets learn below step vise..!
Make a USB for installing backtrack five and start the setup as I have told you in below post:-
How to install Backtrack Five
After that in the step below just choose this option as it will detect any Windows which is already installed in system “Install them side by side, choosing between them each startup” and click forward.

After this click check the all settings and then hit Install. As I have told you in previous article that It will take some time at 99% so don’t worry and after a restart you will be given this screen. Just choose the first option:-

As mentioned in previous post do not forget the default username root and password toor, and do not forget to change them. And enjoy using any windows and Linux together as at every boot you can choose which OS to be used.
Install Ubuntu 10.10 with Windows[any] Together


Lets start the guide how to make it possible:
1.Download ubuntu iso from here:
Download Ubuntu Iso
2. Grab Wubi:
Download Wubi
What is wubi?
Wubi is an officially supported installer for Windows users that allows Ubuntu to be installed and uninstalled in a safe, easy way as with any other Windows application.
3.Starting installation:

Put ubuntu 10.10 iso and latest wubi in same folder, double click wubi and this window will appear:

Follow the guide as shown in pic, After its installation, restart pc, and at the boot menu of your, select ubuntu installation, After its installation you will we able to run both operating systems windows as well as ubuntu.
Congo, you have just done,
How to install Backtrack5-A WANTED OS for Linux Users

We can use many methods like getting a DVD of backtrack 5 from market or else getting it installed from any other expert but why should we try it at our own? well I will try to talk as much easily as I can. I must tell you that this Linux flavor is really good for those who are hackers and also for those who are penetration testers and audit servers and systems. Here for installing back track we shall need these things:-
Requirements for installing Backtrack 5:-
- A USB disk of over 4GB free space.
- A Backtrack 5 ISO downloaded from here. (If you are beginner you should choose genome)
- Brain the most important thing
.
Making USB for installing Backtrack 5:-
- Download unetbootin which you are going to use while making a USB for installing bt5(backtrack 5) , well unetbootin is a software which can be used to make bootable USB’s of many Linux flavors. It loads distributions either by downloading a ISO (CD image) files for you, or by using an already downloaded ISO.
- After it plugin your USB device and format it to FAT 32.
- Now, start Unetbootin and select “Disk Image” option and then select the downloaded ISO of bt5 where you have downloaded it.
- Select the required USB drive and then hit “OK” , your USB disk will be created.
- Do, remember that as default the username is “root” and password is “toor”
Installing Backtrack5 From USB:-
Now, your USB disk is ready and you can use it to create dual boot as well as much more but here I am going to show you that how can we install it in a system in which no windows I present. (later I’ll post that how to make dual boot)- Go to your system setup and select boot order in that set USB drive at first number. Now restart computer and your computer will boot from USB.
- Let the default boot option start in unetbootin boot menu.
- After that at the bash prompt, type “startx” to enter the GUI (Graphical Interface).
- You will be taken to the desktop after that double click “Backtrack.sh” to start installation it will be present at desktop it will take sometime to load. (If you are prompted for password before this step then use “toor” and username is “root”.
- Select the language and click on the forward button.
- Select your geographical location and time zone than click on the forward button.
- Choose your keyboard layout, or leave it on a default i-e USA
- After that choose the following option “Erase and Use the Entire Disk” as I did in screen shot below as we are assumed to make new installation of bt5:-

- Now, hit forward and check out that all the selected options are right or now as in this step it will tell you that what you have chosen for bt5 and hit forward.
- Your installation will begin and at 99% it will take some time so don’t worry and don’t think that your computer is not responding. After this restart your computer when installation is finished.